Friday, October 22, 2010

Sunroom Makeover Part 3: Before & After

{Before & After}

And now, time for the big reveal!

But first, let me torture you with a before shot.

The 'Before' pictures were taken during our search for a house, so please note that the choice of furniture and decor were chosen by the previous owner.


This room was lacking a few things ... color, character and charm. I'm hoping that I was able to accomplish all three of those things with the makeover below.

Here's the same sunroom after some paint, new furnishings and a power-scrub to the deck (thanks, Jesse!). As you can see from the pictures below, we were able to get everything we wanted out of this room. We ended up with enough seating for four people (the love seat, desk chair and reading chair), a functional space (the computer desk) and cuteness (need I say more?)!


{Before}


{After}


{Before}

check out how green the deck is!

{After}


Ok, enough of the before pictures, here are a few more close-ups of the room. Enjoy! :)


And just for Jesse, here's our deck after the mini-makeover! Jesse took the time to power spray and scrub down the deck. After that, he followed up with a wood stain to brighten everything up. Once that was done, we bought a compact patio set and 2-burner grill. Our deck went from being completely useless to the perfect place for a summer BBQ.

Also, did you notice the colorful mum on the ledge? As usual, there's a story behind it. Let's just say, this might not be the first one I bought this season. More to come next week ....


Interested in seeing how the sunroom makeover came together?
Check out Part 1: The Planning Stage and Part 2: Go Big or Go Home.

This makeover is linked up to HOUSEography's Room-by-Room Link-up Party.

Thursday, October 21, 2010

Oh Happy Day!

Ok, don't be disappointed, but this post is not about the sunroom.


However, it is about something VERY important.


(For those of you wondering what's going to happen to the final sunroom post, don't worry it'll be coming tomorrow! Cross my heart!)


Anyway, back to the important stuff ........


drumroll please .........


bbbbbddddddddddddddddddrrrrrrrrrrrrrrrrrrrrrrrrrrrr (that's the drumroll)


Buster is 100 days old!


Let's take a little walk down memory lane to see how much he's grown and the hardships he's overcome. (I know, I'm so cheesy!)


Day 1: I spotted this basil plant at Whole Foods and brought the little guy home with me. Read all about my plant challenge and date tracker here.


Day 17: I left my little plant out in the rain and thought I lost him. Read about my total fail in this post.


Day 30: My little plant recovered so I give him an official name ... introducing Buster! And if you read the entire fail post, you'll see how Buster got his name.


Day 45: Buster kept getting stronger so I decided to give him a permanent home. Welcome to your new house Buster!


Day 100: He hasn't been quite as green since summer ended, but he is still growing and every time I check he has more leaves! I've been able to use the fresh basil in so many wonderful dishes, like my grilled margherita pizza and summer pasta creations. I can't wait to see what I come up with this fall! I'm dreaming of the day he has enough leaves to make fresh pesto, but I'm going to have to be patient because he still has a long way to go grow! :)


Happy 100 days, Buster! 
And here's to the next 100! :)

Tuesday, October 19, 2010

Sunroom Makeover Part 2: Go Big or Go Home

My family lives by the motto Go Big or Go Home! You can guarantee that if we're taking on a a DIY project, it will require at least three trips to Michael's, two cans of spray paint and one full night of working. And if we're going out shopping to decorate my house, then we're going out on a mission and spending the whole day (or 3 days) comparing lamp shades, love seats and wall art. So needless to say, when Jen, Aron and I started shopping for the sunroom, we did as the motto says, we went BIG ........ and then we went home.

{Shopping}
Day 1: Leesburg Premium Outlets
We started our adventure at the Outlets, where we found a 5x8 jute rug and 3x5 blue and green striped rug, as well as a table lamp, huge vase and curtains. Our first trip was successful and we ended up with a great base to tie in the greens and blues.


Day 2: IKEA
Shopping mecca of the world, here we come! We headed out early in the day and it's a good thing we did because we spent all day eating Swedish meatballs shopping. This trip was even more successful than our trip to the outlets. After eight hours of following the wonderful little black arrows through IKEA, we came home with wall decor for my bedroom, a tv stand for the living room, curtains for the dining room and a coffee table, side table, lamp, fabric, pictures, frames, vases, baskets and plants for the sunroom.

When most people hear that we were there for 8 hours, they look at me like I have three eyes. Then I tell them that we had fun doing it and the three-eyed-look is taken to a whole new level (I'm talking horns and purple hair kind of looks). Much to everyone's disbelief, we had a blast and I have the pictures to prove it:

Jen pretending to order an omelet at my "restaurant,"
Made to Order (yes, we made the sign)

Aron answering our "what in the heck is
this for" question -- it's a gaming chair!

Jen was the lucky one who got to cram in
the back seat with all our purchases!

Day 3: Tyson's Corner and Crate & Barrel
We had made significant progress in the room by the time we went on this trip, but we were still missing one key factor -- furniture! We set out to Tyson's Corner where we picked up two chairs, a pillow and some twigs from West Elm and then swung by Crate & Barrel to grab the Sloane Leaning Desk.

In between shopping trips, (read: late at night) we worked on putting together our purchases and setting up the room. While it was three days of never-ending work, it didn't feel like it. In fact, when all was said and done, we felt so inspired we talked about how we could totally do this for a living. It's fun to dream! And in reality, we were all so exhausted that by the time we got everything into the room, we couldn't see straight anymore, but we didn't give up!

{Putting it Back Together Again}
When Jen and Aron left town I had two things left to accomplish. The first was apparent right away. I still needed to find a sofa for the room. We found the perfect love seat at Ikea while we were there, but as it turns out, a sofa doesn't exactly fit in the back seat of a Malibu.

Perfect love seat at Ikea ... if only I could take you home :(

Realizing that I had no realistic way to transport something so large all the way back from Ikea, and not wanting to spend a significant amount of money on renting a truck, I started scouting out love seats on Craigslist. I must've been having a lucky day because I found the exact love seat that we saw at Ikea (originally $479) for just $100! (Bonus: it was only 5 miles north of our house.) Jesse and I rushed out of work that night, rented a truck from Home Depot ($20), loaded up the love seat and had it in our sunroom before dinner time. Victory!

Once I had everything in place, I realized that the second thing I needed to do before the room would feel complete; add color to the walls.

The beginning of my cute little sunroom, begging for some color!

I know, you're supposed to paint before you do anything else, but remember who we're talking about here -- Lil-Miss-I-do-everything-backwards-and-like-to-take-the-long-way-around. So just as quickly as I filled the room, I emptied it back out for Marc to paint. (Check out my previous painting post to see how we settled on the color.) After only a day, he finished everything and left me with the most gorgeous room I've ever seen.

Here's one little teaser to get you ready for the before and after pictures tomorrow ... enjoy! :)


Want to see where my inspiration for the sunroom started? Check out Part 1: The Planning Stage

Monday, October 18, 2010

Sunroom Makeover Part 1: The Planning Stage

I know this post is long overdue, but better late than never, right?! I've been meaning to post something on here for awhile now, but when I started this post 2 months ago I didn't realize what it would become. Now that I've finally finished it, I realized that it was way too much to squeeze into one post. Sooooo, I am breaking it up into three sections. I promise I will post all of them this week, but rather than boring you all at once, I thought it would be more fun to drag it out. :) So without further ado ...

Sunroom Makeover Part 1: The Planning Stage

Our empty house before we officially moved in.
The sunroom is the room in the back.
Redoing our sunroom was an amazing experience. I'm not trying to brag or anything, but as one of my first big projects, I think it turned out quite well. :) I started with a plain 8 x 10 white box and now I have a serene, nature-inspired room that Jesse and I use almost everyday.

When we moved in, I decided to start our design adventure by setting up the bedrooms and kitchen/dining room. Since our focus was on those main rooms, we left the very blank canvas of our sunroom exactly as it was, blank and empty. With not much design experience, I felt overwhelmed by the white space, not sure where to start!

I wish I could take the credit for transforming the empty space into such a wonderful room, but I got a lot of help from my sister, Jen, and her husband, Aron, who helped me make this house a home!

In February (yes, that's how long ago this started), they came out to visit and help Jesse and me pick out a few things for our still barren house. The intention was to focus on the dining room and living room, but as it turns out, my sister was inspired by the very same blank canvas that terrified me. We managed to work on the dining room and found a few things for other rooms of the house, but most of the focus was on the sunroom. Jen works for Pottery Barn and was born with an eye for design. She's had a lot of experience setting up room displays so she knows all the design rules, like the rule of three and anchoring furniture in a room. Not to mention, when you put Jen, Aron and me in an Ikea for 8 hours, anything is possible!

{Needs Assessment}

Before our shopping adventure began, Jen asked Jesse and me what we wanted this room to be, so we tried to come up with a few things to lead us in the right direction. When thinking about how we wanted to use the space we knew it needed to be functional, but we also wanted to make sure that it had nice visual appeal because of its central location in the house. Moment of honesty: Jesse wanted function, I just wanted cute!

Here is a list of the three main goals we had for the space, as well as pictures from a few rooms that inspired me along the way:

1. A Space to Relax: We wanted a space where we could get away from all the craziness of life and put up our feet. Our TV is in the living room, so while one of us (read: me) is watching a show (read: Project Runway or Glee), the other one (read: Jesse) needs a little quiet space. We wanted the sunroom to become the perfect room to do just that.

I really love the colors in the room below and all the windows make me think of our sunroom. Since they didn't have space to hang art on the walls, they chose to make their furniture serve as art - gorgeous! With all of the available seating and bright colors in the room, this space feels very livable.  (photo courtesy of: www.housebeautiful.com)


2. Function: While a sitting room sounds all fine and good ... who really just sits around all day? We needed a room where we could get work done. We setup an office in one of our guest rooms, but since it's upstairs, we haven't gotten much use out of it. It feels very secluded from the rest of the house, which is nice for conventional office uses like working from home and paying bills, but we were looking for something close to the living room that we would use everyday. We thought it would be nice to setup a smaller office space in the sunroom where I could easily run to look up a recipe or upload pictures.

Below are a few home offices that take up minimal space in the room. I like how each office is setup in the corner, so they don't feel like the centerpiece of the room. (photos courtesy of: www.apartmenttherapy.com, www.realsimple.com, www.realsimple.com)


3. Welcoming Appeal: We tend to have a lot of visitors throughout the year and while we really enjoy hosting people, we felt like we had limited space to entertain. We wanted a room where we could go with guests to hang out and not be planted in front of a huge TV. This meant that somehow we needed to get seating for four into this very small space.

Each of the rooms below are setup around an open layout, meant for seating several people. While we didn't have nearly as much space to work with, we wanted to make sure that it felt welcoming and had plenty of options for seating. I also love the blues and greens in both of these rooms! (photos courtesy of: www.housebeautiful.com)


{Inspiration}

Once we identified what we needed to get out of the space, we moved on to deciding what we wanted the space to look and feel like. If you don't start with something in mind, shopping tends to be frustrating and unsuccessful or, on the flip side, you'll come home with a hodge-podge of items that don't go together. So, in order to prevent either of these things from happening, I focused on finding inspiration for the room. After perusing several websites, I realized that the inspiration was sitting right in front of me.


Jesse and I went to Jamaica for our honeymoon and while we were there we picked up this hand-made vase. I love the look of the green and blue against the terracotta base. I showed it to Jen and Aron before we ventured out and told them I wanted this to be the inspiration for the room. So, with the vase in mind and our needs identified, we headed out for three full days of shopping.

Unfortunately, you'll have to wait until tomorrow to see what we picked up on our shopping marathon! I PROMISE you'll get to see our entire makeover by the end of the week, but you'll have to be patient. :)

Friday, October 8, 2010

Trader Joe's = Healthy ... right?

As it turns out, I have a minor addiction to reading blogs. Not just any blog will do though. All of the blogs I follow land in one of two categories:

1. the writer discusses food and/or home decorating on a regular basis (no big surprise there, right?).
or
2. the writer is one of my friends.

So with that, let me introduce you to one of the wonderful blogs I like to read, Love and Olive Oil. This blog fulfills the "blogging about food" category. The co-authors are Taylor and Lindsay, a married couple based in Nashville, TN. According to their "about me" section, they're all about quick and flavorful dishes that don't hurt the wallet. Sounds good to me! About 6 months ago, my brother-in-law, Aron, pointed me in their direction to show me a decadent chocolate cake that he made from one their recipes, and I've been tracking them ever since.

About a week or two ago, they posted a recipe for Dark Chocolate Peanut Butter Cup Cookies. Let me give you a moment to soak it in ............... yum, right?

If you know me pretty well, you know that I LOVE peanut butter and that I think dark chocolate beats milk chocolate, hands down! Does it get any better than a cookie that combines the two? The correct answer is: no!

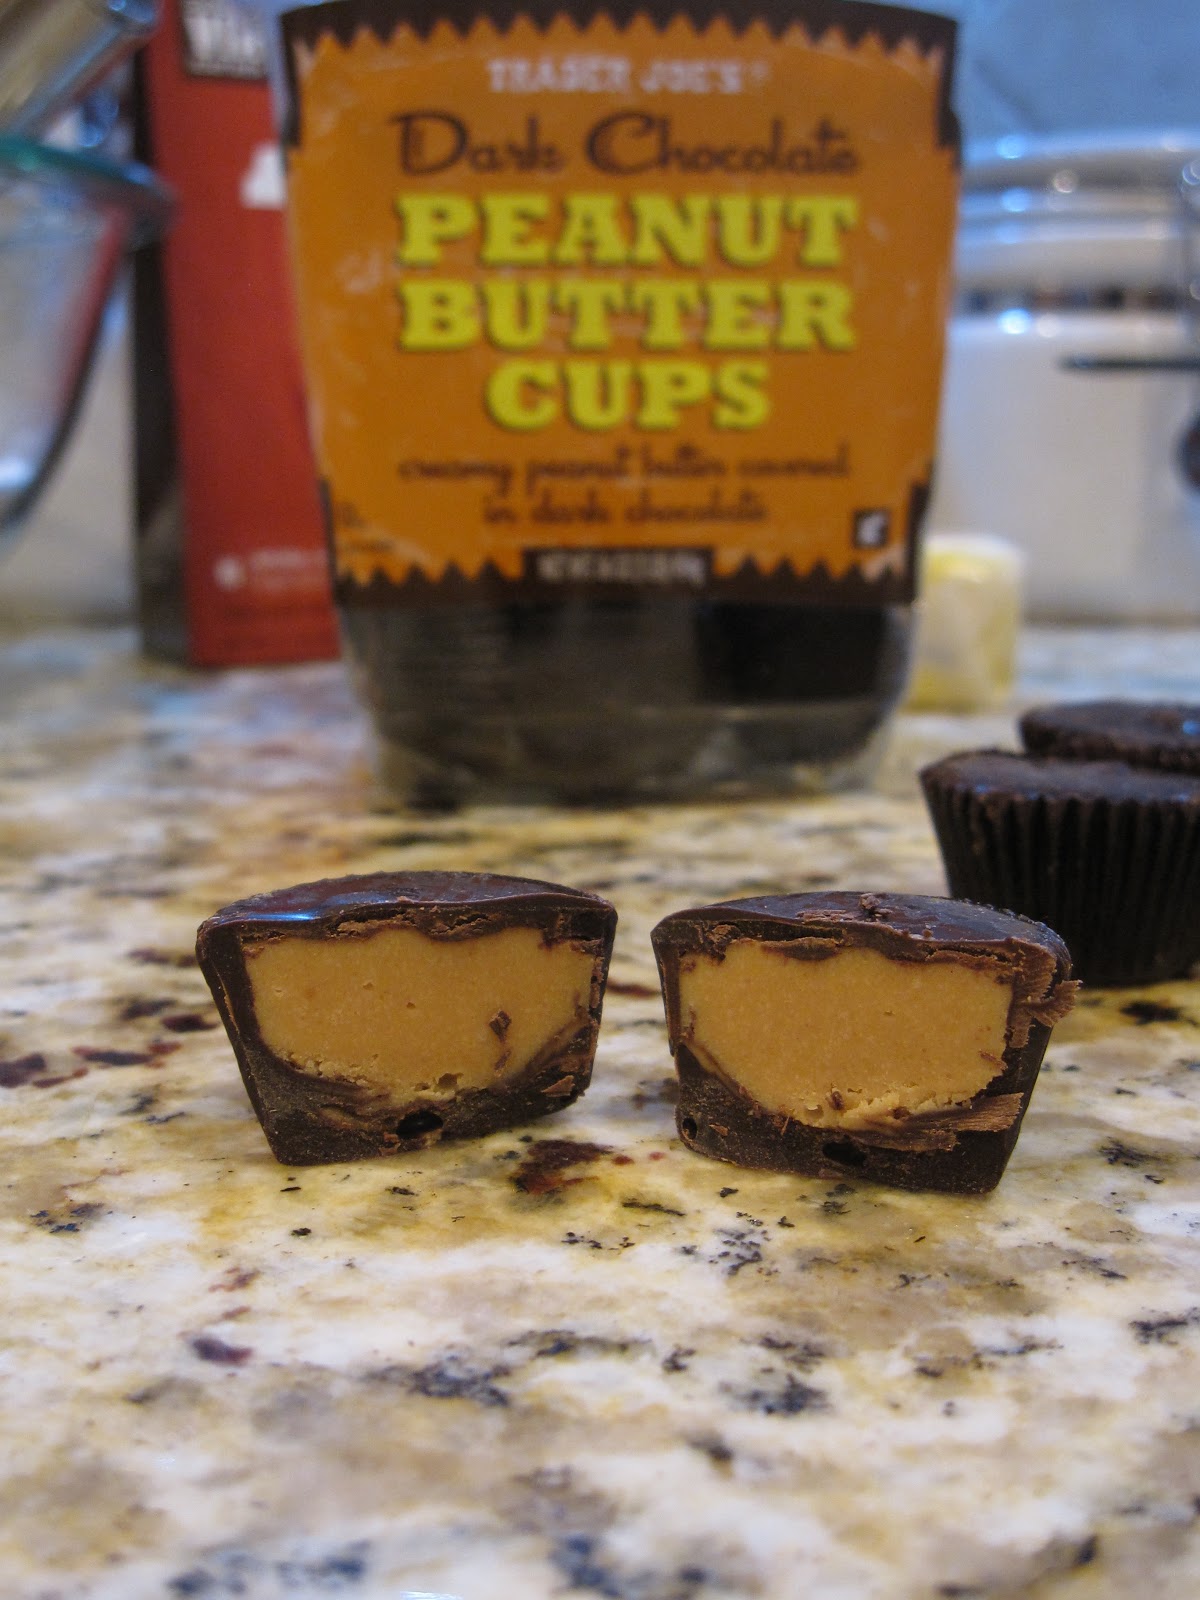
The recipe calls for Trader Joe's Dark Chocolate Peanut Butter Cups and after Lindsay (or Taylor) mentioned how amazing the little cups are, I noticed that all of the commenters agreed. Well I'm here to tell you, they weren't lying! I was walking through TJ's this week doing my usual shopping, when I looked up and saw them. Those little dark chocolate cups were staring me in the eyes, begging to be picked up, so I had no choice but to throw them in my cart and run! Alright, I didn't really run, but I did go straight to the check-out before I changed my mind.


I came home and started looking at the recipe to make sure I had everything else to make the cookies, but realized I was missing the bittersweet chocolate chips. While I knew it wasn't a huge deal, I was worried about losing some of the chocolatey-goodness by leaving them out. I thought about it overnight and decided to modify the recipe to make more of a chocolate chip style cookie with the peanut butter cups in place of actual chocolate chips. And without further ado, here is my version of the Dark Chocolate Peanut Butter Cup Cookies:

Dark Chocolatey-Goodness Peanut Butter Cup Cookies


Yield: about 18 cookies
Time: 15 minutes prep, 10 minutes per batch

1 cup all-purpose flour
3/4 tsp. baking soda
1/2 tsp. salt
1/2 cup (1 stick) unsalted butter - at room temperature
1/2 cup granulated sugar
1/3 cup brown sugar
1 large egg
1 tsp. pure vanilla extract
15-20 Trader Joe's Dark Chocolate Peanut Butter Cups

1. Freeze the peanut butter cups for about 30 minutes. Coarsely chop the cups into bite-size pieces.

They will look something like this ... I know it's tempting, but don't eat them yet.


2. Preheat oven to 375 degrees. In a medium bowl, whisk together flour, baking soda and salt. Set aside.

3. In a large bowl, with an electric mixer, beat butter and sugars until light and fluffy. Add egg, beating until combined; mix in vanilla.

4. With mixer on low speed, add flour mixture; mix until just incorporated. With a rubber spatula or wooden spoon, stir in the peanut butter cups.


5. Drop mounds of dough (about 2 tablespoon's worth) onto an ungreased baking sheet (you will probably need to separate into two batches), at least 2-inches apart. Bake until golden, 10 -12 minutes, rotating the pan halfway through cooking.

6. Cool 1 to 2 minutes on baking sheets, then transfer to a rack to cool completely. Try your hardest not to eat them all before you take them to work to share with all your co-workers.


Ok, that last line was just to make sure you're paying attention. I made these cookies tonight so I can bring them into work tomorrow. I thought it would be fun to have an office warming party, complete with cookies and milk! I know you won't believe me when I tell you this, but I haven't eaten one yet. I'm TRYING my hardest to wait so I can have one tomorrow with everyone else ... I'l let you know how that plays out. :)

Thursday, October 7, 2010

She's Baa-aack!

Ok, clearly I've had trouble keeping up with my life my blog this past month. As many of you know, I was promoted to a new position at work over the summer, and let's just say I had my work cut out for me. At first I didn't think much would change, but then we hit our busy season. September turned out to be a crazy month - Jesse and I were constantly at work much later than our usual schedule, plus I was traveling for about 10 of the 30 days in September. But enough about my sob story, I'm back in action! :)

This month I'm planning to:
  1. post pictures from my sunroom re-do (finally)
  2. show you a few of the festive seasonal accents that I picked up
  3. show off a few DIY projects my mom and I tackled when she came to visit AND
  4. share pictures of my new office at work, which I'm currently in the process of setting up (get excited -- there will be before and after photos!).
So to kick-off my October blogging, I should begin by telling you that I went shopping tonight ... and I had fun, a lot of fun! I only went to TJ Maxx, but I found a few things* to get started with my office makeover, plus a much needed accessory-organizer for my dresser.

*Moment of truth: I found WAY more than a few things, but after stuffing my arms full of wonderful TJ-treasures, I decided to cut back on my splurge, which meant that the cute chunky-heel leather boots and sleek DKNY black bag had to go back to the shelf, along with a few other less-important impulses.

Anyway, I'm really excited to show you what I got for my dresser. I found this really neat shadow box with a hinged, magnetic frame that opens up for easy access:

I forgot to take a before picture, but here is a cropped
"during" picture to show off the original shadow box.


And here's a better shot with the cover open.

For the past year or so, I've been planning to re-organize my jewelry box and make some of my everyday pieces more accessible. I've toyed around with the idea of making my own hanging board for necklaces or earrings, but I never settled on a final plan (enter shadow-box, center stage). So when I saw this shadow box at TJ's I knew I found the perfect piece! Rather than spending countless hours and god-only-knows how much money, I decided to use the shadow box as my new earring case.

Oooooohhhhhh .....


Aaaaahhhhh ......


And in case you wanted a close-up! 


So for just $13.00 I found a perfect solution for my previously over-stocked jewelry box! I love how accessible everything is, and the fact that all my earrings, most of which cost me less than $10, are behind a glass case -- classy -- or should I say glassy?! Too much? Oh, it feels good to be back!

P.S. I'll get back to the office decor soon -- Ikea shopping trip planned for Saturday, so you're sure to see something posted on here if I make it out alive! :)